|
|
|
|
|
 |
Instruction - Ground Set Internal Winch |
|
|
Back to Instruction
INSTALLERS TAKE
NOTICE! Overhead electrical lines, buried utility cables,
and natural gas lines pose situations that require EXTREME
CARE DURING INSTALLATION of foundation and flagpoles.
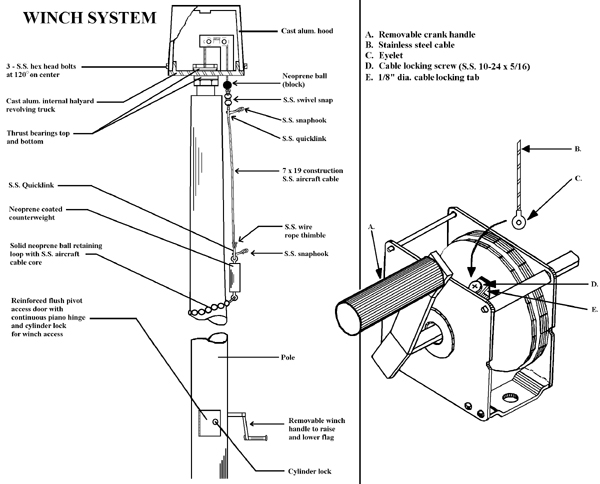
MATERIALS: * - attached
to cable at factory, before shipping.
A. neoprene ball *
B. stainless steel swivel *
C. quick links *
D. snap hooks *
E. neoprene retaining loop *
F. neoprene/ steel weight *
G. stainless steel cable
H. winch handle and keys
I. winch (inside pole)
J. internal halyard truck
K. aluminum hood and screws
L. aluminum collar
I. STORAGE:
1. Remove wrapping materials and set pole on blocks (in dry area).
CAUTION:
Wrapping materials, if left on pole, can cause serious staining of aluminum pole
in damp environments.
2. Check for any transportation damage.
Poles with 2 or more sections, check for burrs and damage.
3. Cleaning - dirt, oil,
fingerprints, etc. can be removed using detergent and water.
II. ASSEMBLY OF MULTIPLE SECTIONED POLES:
CAUTION: On poles with two or more sections, each section of pole will be marked.
Assemble only top and bottom sections that have matching dash numbers.
1. Elevate the bottom section of the flagpole horizontally off
the ground. Place it on suitable supports being sure to protect the flagpole
finish.
2. For your convenience a tag line has been installed in each pole
section. Carefully tie the tag line sections together and tuck any excess line into
the pole so that it is not pinched when the pole sections are joined.
3.
Attempt a trial fit of the top section to the bottom section
of the pole by lining up marks on the bottom section with the matching marks of
the next section. At this stage in the assembly procedure, do not force the pole
sections together. If the fit is too tight, remove the top section and carefully
grind the bottom section sleeve until suitable fit is achieved. Be careful not to
remove too much material as this will result in a loose fit. Repeat this procedure
several times as necessary.
4. When joining pole sections protect both ends of the pole with
heavy planking. Place the pole bottom against a rigid support and hammer or push
from the top (with planking as protection) until the pole sections come together.
III. FINIAL ASSEMBLY:
1. If a ball, eagle, or other type of finial is included with your
equipment apply epoxy to threaded end of finial. Mount by screwing into the top
of hood. Tighten with a wrench.
IV. CABLE, SLING & WEIGHT ASSEMBLY:
1. Carefully uncoil cable and straighten (check for any kinks or frays).
2. Run end of cable through sheaves in truck, then through spindle.
Tie or tape the cable to the tag line at the top of the pole.
3. Screw the truck into the coupling at the pole top. Tighten with
a wrench.
4. Open the access door at the base of the pole and gently pull the tag line through the inside of the pole, and attach the cable to the winch with
the screw located in the winch drum tab.
5. With the door still open, insert the winch handle and wind up
the excess cable on to the winch drum while someone is maintaining tension on the
cable at the pole top. This will ensure a tight well-nested cable layout on the
winch. Close and lock the access door.
6. Attach the cast aluminum hood to the truck with the hex head
screws provided.
7. Make sure the retaining loop and flag cable, with weight attached,
rests on the pole surface.
V. POLE INSTALLATION:
Note- Before lifting pole, slide flash collar, if supplied, up from bottom and hold
in place at door location by tying off to the pole with a section of tag line.
1. Use only an experienced flagpole crew and crane operator to lift the flagpole
into a vertical position and insert it into the foundation tube.
2. After inserting into sleeve, center pole in base of sleeve and
plumb pole with wooden wedges (supplied by others).
3. Fill space between sleeve and pole with screened dry sand. Tamp
down tight every six- (6) inches and check vertical alignment with a 5� carpenters
level.
4. Slide collar down into position and caulk around top.
5. Check winch operation by lowering weight and sling assembly
to door level and then back to the pole top. Make sure that the cable flows smoothly
from left to right and right to left.
VI. OPERATING INSTRUCTIONS FOR INTERNAL WINCH SYSTEM:
1. Open the winch access door and insert the winch handle.
2. Slowly and evenly lower the retaining sling and weight to a
location just above the collar. 3. Attach the flag to the snap
hooks at each quick link location and raise flag to pole top.
4. When the neoprene ball stop reaches the pole top remove the
winch handle and close and lock the access door. CAUTION: Raise and lower flag
at a slow even pace always keeping tension on the cable.
|
|
|
|
|
Design - Engineering - Manufacturing |
|